| Basic branching |
|---|
 |
| Octopull/SW development: Using CVS for Version Control |
|---|
| Home | C++ articles | Java articles | Agile articles | Bridge lessons |
Scope
Introduction
Structure of this document
What is version control?
What do we want from version control?
TANSTAAFL
Developing with CVS
Testing and releasing with CVS
An example project
Version Control Patterns
Setting up a branch for your work
Documenting a change
Merging from branch to trunk
Merging from trunk to branch
Tarzan - swinging from branch to branch
Gathering branches
Removing changes
CVS Idioms
Getting started
Marking a version - tags
Creating a branch
Working on a branch
Making changes
Checking in your changes
Abandoning your changes
Bringing your working copy up to date
Incorporating a branch into your working copy
Incorporating a change into your working copy
Listing differences
Working on the trunk
Creating a new project
Using WinCVS
Getting started
Marking a version - tags
Creating a branch
Working on a branch
Making changes
Checking in your changes
Abandoning your changes
Bringing your working copy up to date
Incorporating a branch into your working copy
Incorporating a change into your working copy
Listing differences
Working on the trunk
Microlise specific conventions
Tag names
branches.txt
This documents provides a general overview of the use of sourcecode version control within a software development project. It outlines the facilities required to support the development process and introduces the specific features of CVS[1] that provide this support together with the working practices that leverage this support to best effect.
This is not a training manual for specific roles within a project - for example, it does not detail specific release management, testing or development activities that require the use of CVS. However, it should provide sufficient information on using CVS to allow these tasks to be accomplished.
This is not a reference manual for CVS - that is "Version Management with CVS"[2], nor is it an adequate guide to implementing CVS on a project - that is "Open Source Development with CVS"[3] It does, however, cover the concepts and operations most needed by a CVS user or in short-listing version control systems prior to a detailed evaluation.
A problem with many discussions about version control is that there is no uniform expectation of the facilities offered by a version control system. Partly, this is because people's experience of version control tools varies and partly because it is part of a spectrum that runs from "file versioning" through "change control" to "change management". The remainder of this introduction covers the facilities for version control that are provided by CVS (and comparable tools). (It also serves as an introduction to some terms that may have slightly different meanings with other tools.)
The next section (Version Control Patterns) uses the idioms described in earlier sections to develop methods of working that address the needs of the Microlise software development processes. While these have been developed in the context of a single organisation they are likely to be more widely applicable (I'm very happy to receive feedback on this - Alan.).
Following this is an introduction to the key commands required to use CVS on the command line are described in CVS Idioms. The command line is addressed as it is the most portable, and best documented CVS client (but many others exist) and is used in scripts. In addition CVS has been integrated into various IDEs, the Windows shell (Tortoise CVS[4]), and several GUI interfaces. Because of its popularity at Microlise WinCVS is addressed in Using WinCVS.
Finally, there is a need to define conventions for naming things within CVS. In the nature of things such conventions are both necessary and largely arbitrary. The conventions used by Microlise are descrived in Microlise specific conventions.
Fundamentally version control is about being able to manage versions of the computer files that comprise a project. This management includes the ability to reproduce identified versions of the project files, to query differences between versions and to allow the changes made between two versions to be applied to a third.
There are significant differences between version control systems in the way they implement these facilities - at their most primitive they do no more than record a sequence of changes to individual files, at their most sophisticated they also manage the addition and removal of source file, allow concurrent changes, automate the software build process, ensure regression tests succeed, enforce sign-off processes and create and distribute the resulting software.
The following discussion moves from being generic in nature (the problems solved are common across version control tools) to the use of CVS as a specific example of a sourcecode version control system. CVS is a free (GPL[5]) version control system that falls between the primitive and sophisticated extremes identified above: as with much 'free' software it provides a basic set of (version control) features important to developers and does it well. It does not provide the additional process management features available in some commercial products (but there are separate tools for some of these tasks that integrate with CVS).
As an individual developer I want a version control system to manage the changes that I make without putting obstructions in the way of my making them. Ideally I just want to make changes to my working copy of the system and for any interaction of these with the shared development and/or release versions of the system to be correctly resolved. Within my working copy I'd like to be able to use the version control system to answer queries such as "what did I change this morning?" and to facilitate operations like "undo all my changes to this file" or "undo the changes I made last Friday afternoon (without losing any prior or subsequent changes)".
Note for users of Visual Sourcesafe or SourceIntegrity
Some version control systems only allow a single developer to edit a file at a time (a file must be "checked out" or "locked" before making changes). The motivation is to avoid conflicting changes being applied by two developers.
However, in practice, when version control prevents developers from making a necessary change they bypass the version control system in order to get work done. (By changing local copies of files followed later by manual integration of their changes.) This risks scenarios where neither of two developers can check in their changes without first updating one of the files "locked" by the other.
CVS allows two (or more) developers to record their changes and provides support for merging the changes. Specifically, it allows a developer to apply both sets of changes to their working copy prior to checking in the "merged" results. It doesn't compile the resulting code or run any tests: that is the responsibility of the developer.
Whether working as an individual developer, in testing, or as a release manager I want to be in control of when the changes other people make impact my working copy. Ideally the version control system will allow me to choose when to update my working copy, to select specific updates and to ensure that the all the changes relating to the update are applied.
Note for users of Visual Sourcesafe or SourceIntegrity
A problem that occurs with some version control systems is that they only allow "check out" of the latest version of a file. This can be a problem for a developer, because this version may not be consistent with other files within the working copy - which forces a ripple of updates to the working copy. Not only can this be time-consuming it can also destabilise a problem investigation.
CVS allows me to update the version of a file that is currently in my working copy and provides support for merging external changes into the system when I reach a suitable point in my work.
Reworking these requirements as a checklist:
I've never encountered a tool that provides the ideals outlined in the previous section without any effort on the part of the users. In particular the version control system usually needs to be informed of some types of changes, and to be asked explicitly to record or apply others. In addition, steps need to be taken to group changes that correspond to a logical update (e.g. a bug fix or new feature).
In particular, although many version control systems allow multiple developers to update a project or file, automatic merging of changes cannot always be relied on. For example it is possible for one developer to remove an unused item (file, variable or method), whilst another adds code that makes use of it. In practice, such problems can be detected automatically, either when doing the merge, by rebuilding the resulting software, or by running a smoke test[7]. Once such a conflict has been detected manual intervention is invariably required to resolve it.
The following section identifies ways of working with CVS that allow the ideals to be approached.
The key idea to understand when working with CVS is that the copy in the repository is the important one. The working copy that you have on your disk is ephemeral, the copy in CVS is preserved for posterity. Only when the user issues commands does CVS update the working copy or apply changes to the repository.
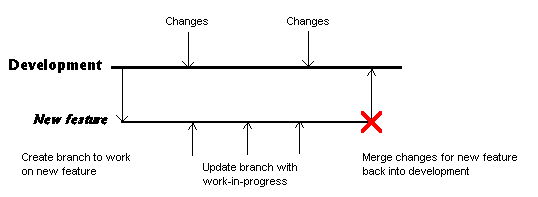
It should, therefore, be no surprise that in order to track concurrent changes by individual developers separately (as described above) it is necessary for each developer to maintain a separate version of a project within CVS. The mechanism that CVS provides for this is "branching" - each branch is an independent version of the project.
By working on a branch you allow CVS to track your changes for you whilst being isolated from any other work being done at the same time. It also means your changes don't affect anyone else and you are not affected by them (unless or until you intentionally merge the changes).
| Basic branching |
|---|
|
Unless the version within the repository is updated to match the working copy on a regular basis developers won't be able to use the CVS facilities to manage changes, so it is a good habit to check in changes on a regular basis - after each cycle of update, compile and test is about right (i.e. several times a day). Remember, these check-ins only affect the current branch.
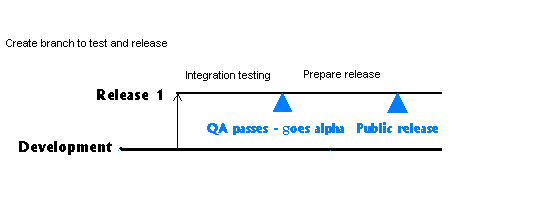
The CVS branching mechanism also provides a convenient way to group changes relating to a logical update - by creating a branch for each such update allows the changes to be identified as those that occur on that branch. On completion of a logical update several things need to happen: the change must be made available for testing, the change must be integrated into the principle development version, and into any appropriate release version - this is discussed further below.
The testing and release functions have similar needs to control change as developers. But source updates should always be initiated by developers and applied via the version control system - not by changing the sourcecode used to build the system under test. For this reason they too should work on branches - although in this case the branch will, potentially, be 'handed on' from testing to release.
| Branching for testing and release |
|---|
 |
Note on terminology
Because the role of the branch changes during the course of its existence I've never come up with a satisfactory name for these branches. At Microlise, and throughout this document, they are referred to as "QA branches" - even though they are seldom owned by QA.
The only difference between a "development branch" as described in the previous section and a QA branch is way it is used. This means that, if it becomes necessary to correct a bug on the release branch, a developer can make changes in just the same way as during development.
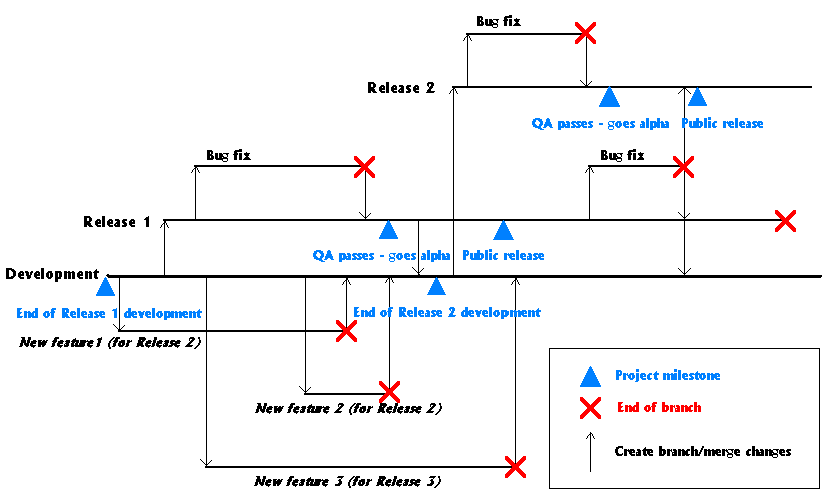
The project we are going to consider is the development and maintenance of an application that is maintained over a series of releases - the series of releases is open ended. (I've used CVS with up to two dozen developers on projects up to a million lines of code, I've heard reports of much larger projects.)
In this project the main branch (known as the trunk) is the development integration branch. Most other branches are split off this and have a limited lifetime. In particular, all development of new features is done on branches that are then merged back into the trunk. (This isn't the only way to utilise CVS branches, but I've seen this approach work well in a number of environments - Alan.)
The diagram shows two QA branches - for two major releases of the software. The release process is as follows:
| Branches during the project lifecycle |
|---|
 |
You're about to start a piece of work: developing new features, or preparing the system for a release. In either case you want the version control system to track the version of the software you are working on and any changes that you make independently of anything that anyone else is doing. What you need is a CVS branch set up to track changes in your working copy.
The first thing to do is to construct a sensible name for the branch and record it in branches.txt, next the branch needs to be created and, finally, attach your working copy to the branch.
| Record branch name in branches.txt |
|---|
|
| Creating the branch and attaching your working copy |
|
Your working copy is now ready for you to begin work: CVS will keep any changes you check in safely on your branch until you choose to integrate them back into the trunk.
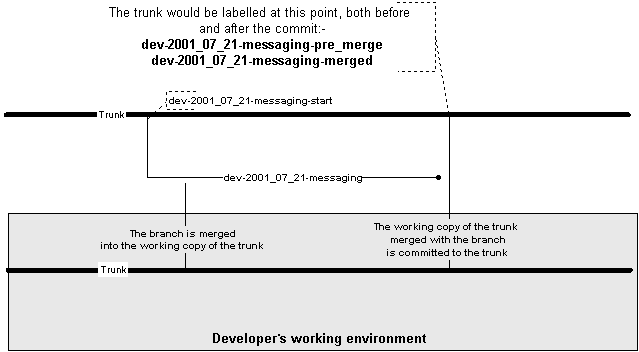
CVS keeps track of all of the changes made to all the branches of system in the repository. However, in the nomal process of developing and delivering software, only a few of these changes will be referred to again. For our own convenience, we make it easier to refer to important changes by giving meaningful names (CVS "tags") to the versions of the system before and after the comitting the changes to the repository. (This allows us to refer to the change as the difference between these tags.)
| Documenting a change |
|---|
|
You've been happily developing a piece of code and updating the corresponding branch for a few hours or days and the tile has finally come when it is complete. (It has been reviewed and signed off, the unit and integration tests pass, or whatever other criteria are applicable.) Now what?
The next thing to do is to integrate the changes on your branch onto the trunk and make them available as part of the system. This is done by getting a working copy of the trunk and merging all the changes you've made on the branch into the working copy and then to commit those changes to the trunk. This is achieved by following the following steps:
| Merging from branch to trunk |
|---|
|
As always, check any conflicts reported by the merge, also remember to compile and test the result before checking in. If you check in something that doesn't compile or pass the corresponding unit test then the project build monitor (and other developers) will require you to fix it immediately.
There are a lot of scenarios where a developer wants to merge into a branch other than the one to which her working copy is attached (most commonly the trunk). If she has been scrupulous about notifying CVS of all files added to the system and checking in all the changes then it is possible to switch the the working copy back and forth for this purpose. However, mistakes happen and, sooner or later, this doesn't work.
An approach that avoids this risk is to check out a separate new working copy of the target branch and merge into that working copy instead.
For the last few days the QA branch of the system of the system has been under test and is now almost ready to ship to the customer. Unfortunately, someone has decided that one last feature needs to be shipped in this release. (This feature is the result of one of the development tasks completed while testing has been going on.)
Making last minute changes is a risky business, but the the developer is confident the the new feature doesn't impact much of the rest of the system - and the project manager, having assessed the risks and benefits, is adamant that the feature must ship.
The following procedure is probably best followed by the developer (when authorised by the testing/release team involved) but can also be followed by testing/release when the developer is unavailable. (In my experience these decisions are always taken after sensible people have gone home for the evening.)
Starting with a working copy of the "QA" branch you merge into your working copy just those changes that relate to the extra feature. When this has been achieved you commit those changes to the branch. This is achieved by following the following steps:
| Merging from trunk to branch |
|---|
|
As always, check any conflicts reported by the merge, also remember to compile and test the result before checking in. If a tester encounters problems building the system then ask the developer to help - she assured you that it would be OK.
In theory work will be assigned so that the work you are doing on your branch is independent of other changes to the system. In practice, one sometimes finds that something you need before you complete your task has only been added to the system after you created your branch.
With a different version control tool you might be able to merge the changes you want to pick up into your branch and carry on. With CVS this will lead to a problem because it will report "conflicts" when it tries to include changes for a second time. But there is a way...
With CVS the approach that works is: create a new branch from the trunk (which obviously includes the features you need, but not your work to date), then merge your changes from the old branch to the new one and abandon the old branch.
| Swinging from branch to branch |
|---|
|
After this your original branch is dead and the new branch is ready for you to continue.
In theory, work will be assigned so that the work you are doing on your branch is independent of other changes to the system. In practice, one sometimes finds that several tasks need to be gathered together and additional work needs to be completed before integrating to the trunk.
The way to approach this is to create a new branch from the trunk, and then merge changes from each of the branches gathered into the new one.
| Gathering branches |
|---|
|
After this your original branches are dead and the new branch is ready for you to continue.
For the last few days the QA branch of the system of the system has been under test and it is now almost time to ship to the customer. Unfortunately, one of the features is just too broken to be shipped in this release. A decision has been taken to remove the feature from the release.
The following procedure is probably best followed by the developer (when authorised by the testing/release team involved) but can also be followed by testing/release when the developer is unavailable.
Starting with a working copy of the "QA" branch you reverse the merge into your working copy just those changes that relate to the feature. When this has been achieved you commit those changes to the branch.
The proceedure is the same as for Merging from trunk to branch with one small variation: the use of the "pre-merge" and "merged" tags is reversed. (I.e. the "merged" tag is supplied first and the "pre-merge" tag is supplied second.)
Note that this procedure can also be applied to the trunk itself. But if you do this remember that the branch will need merging again sometime.
The following notes describe the use of CVS from the command line.
Before you can use CVS you must tell it where the repository is and sign on to the server using your signon and password. Following this you need to have CVS create a working copy of the project you are working on.
If you only (or usually) use a single CVS repository then you can avoid specifying it with the "-d" command line switch each time by setting the CVSROOT environment variable. Using these options the above commands become:
|
There are ways to avoid the need to set the CVSROOT environment variable repeatedly: on Windows it can be set using the System Properties dialog, on Unix the command may be added to your command shell's user profile file.
If you are using several repositories, then you will want to specify the repository on the command line (this is shown for login and checkout the commands to which it applies.
| Logging into the server |
|---|
(if CVSROOT is set to the repository you want) |
CVS will remember your signon for you unless you choose to logout from CVS, in consequence you normally only need to do this once per repository.
A working copy of a CVS project is always created by checking out a project from CVS. To do this you need to specify the repository, the project and (optionally) the branch that you want.
Checking out 'whoops' from
CVS |
|---|
(if CVSROOT is set to the repository you want) |
This will create a 'whoops' subdirectory containing the main branch (the trunk) of the 'whoops' sourcecode.
If you look around the directories that have been created to hold your working copy then you'll see CVS subdirectories containing files that CVS uses for administration purposes. Don't mess with them!
About the CVS administration files
The CVS administration files hold things like the repository from which the working copy was taken, the branch on which you are working and the revisions of the files that correspond to your working copies. The various CVS commands make use of this information so that, for example, you don't need to specify CVSROOT to identify the repository when issuing commands relating to a working copy.
One final thing: CVS identifies the current project on the basis of the current directory. The remainder of this section is written on the assumption that you are in the directory that containing the working copy you just created. So, before continuing issue the following command:
|
To provide convenient access to specific versions of the code, and to facilitate working with the changes between two versions it is desirable to give names to a version in the repository.
CVS allows the user to name a version using the "tag" command.
The simplest use is to tag the version corresponding to a working copy as follows:
| Marking a version |
|---|
|
The names used for working directories, tags and projects are essentially arbitary (apart from restrictions on the valid characters). However, in practice it is desirable to follow conventions that convey information to the project team. Microlise has adopted the standard of maintaining a "branches.txt" file for each top-level project. This is used to record tags used to identify branches - there are conventions for naming branches and for the additional tags associated with each branch. (See branches.txt and Tag names.)
It is often desirable to isolate a version of the system from the changes being worked on by others. This simplifies the management of changes. CVS provides support for this by way of "branching".
The tag command is also used to create branches in the repository using a slightly more elaborate incantation. Note that this does not switch the working copy to the branch - that needs to be done using the update command.
| Creating a branch |
|---|
|
(You don't normally specify individual files to a 'tag' command - it applies recursively to the current directory.)
There are two ways to associate a working copy with a branch - for an existing working copy by switching to the branch or by checking out a new working copy of the branch directly.
| Switching to a branch |
|---|
|
| Checking out a branch |
|
Once a working copy has been associated with a branch any changes made in the working copy and checked in will be applied to the branch. When updating a working copy it should be noted that any changes that have not been checked in will be retained: see Bringing your working copy up to date for details.
To change a file in your working copy you can just edit it as normal. (Don't change the files kept in CVS subdirectories - they are used by CVS).
If you add or remove files from your working copy of the project you need to tell CVS (otherwise it doesn't know if the working copy or the repository is 'correct'):
| Adding and removing files from a project |
|---|
|
| Adding a directory to a project |
|
NB The above commands don't update your branch in the repository, it just records the change in your working copy. To update the repository with your changes you must check in your changes.
When you are sure that your changes will be an improvement (and that they don't conflict with anything in the repository) you should commit them.
| Checking in your changes |
|---|
|
(By default 'commit' - like many CVS commands - applies recursively to the current project. You can specify individual files at the end of the command line.)
Tip: When you check in a file, make the log message (specified by -m) meaningful! Nothing is more frustrating than viewing a file's history, and seeing:
revision 1.45: More bug fixes
revision 1.44: bug fixes
revision 1.43: Fixed some problems
revision 1.42: *** empty log message ***
revision 1.41: asdfdasdf
revision 1.40: changed some stuff
revision 1.39: TGIF
If you've made temporary changes or ones that that you've decided against then you can replace a file (or files) with the contents of the repository.
| Abandoning your changes |
|---|
|
The "-C" option is a relatively recent addition to CVS, if it isn't supported in the version you are using then just delete the file first and then
cvs update example1.txt.
(If you don't specify individual files at the end of the command line then 'update' - like many CVS commands - applies recursively to the current project.)
From time to time, and especially if others have updated the branch you are working on, it is a good idea to update your working copy from the repository. (Particularly before checking things in.)
Change the working directory to the root of your working copy and enter the 'update' command:
| Bringing your working copy up to date |
|---|
|
(By default 'update' - like many CVS commands - applies recursively to the current project. You can specify individual files or subprojects at the end of the command line.)
The '-P' and '-d' flags allow changes to the directory structure to be included in the update.
CVS provides a long listing of what it is doing, most of which is self-explanatory. The only cryptic bit are the codes that appear at the beginning of some of the lines, these are as follows:
| P | A working file was patched as a result of changes in the repository. |
| U | A file overwritten from the repository. |
| M | A working file that has been changed locally. |
| C | A file that you have changed has had also been changed in the repository - and the changes conflict. (You are then responsible for resolving the conflicts - CVS saves your original and marks up the merge file to show the conflicts.) |
| A | A file which has been added locally (but not yet committed). |
| R | A file that has been removed locally (but not yet committed). |
| ? | A local file that isn't known to CVS (neither in the repository, nor 'added'). |
When updating the trunk (or when incorporating those changes into another branch) you need to incorporate changes from a branch into your working copy.
In the top directory of your working copy run the 'update' command:
| Bringing your working copy up to date |
|---|
|
The '-j' flag identifies the branch to be merged.
More detail on the output of the update command is provided above in Bringing your working copy up to date.
When updating a QA branch with a specific change from the trunk you need to incorporate that change into your working copy.
In the top directory of your working copy run the 'update' command:
| Bringing your working copy up to date |
|---|
|
The '-j' flags identify the change to be merged.
More detail on the output of the update command is provided above in Bringing your working copy up to date.
You will frequently want to see what the differences are between your working copy of a file and the repository.
| Listing differences |
|---|
|
(If you don't specify individual files at the end of the command line then 'diff' - like many CVS commands - applies recursively to the current project.)
You may also want a listing of all files on your hard drive that need to be added, checked in, or updated. For this you can use the update command as follows:
| Listing differences |
|---|
|
The trunk contains the latest development version of the system (it is not used to record work-in-progress). Developers need to work on the trunk for two principle reasons:
For both of these activities it is necessary to first synchronise the working copy with the trunk.
| Switching a working copy to the head of the trunk |
|---|
|
This is not something that is done often - it is far more common to add a directory or file to an existing project (these operations are explained above).
When you have a new project containing files you wish to add to the repository it is done using the 'import' command. It is probably best to consult the CVS reference before doing this as the options are not exactly intuitive.
The following incantation will import the current directory subtree into CVS.
| Creating a new project |
|---|
|
Note that this creates a project in CVS - it doesn't simultaniously turn the local files into a working copy - a checkout is still required to create a working copy.
The following notes describe the use of WinCVS on Windows. There are various other Windows based GUI front-ends available. Of these SmartCVS[8] and TortoiseCVS are well worth looking at.
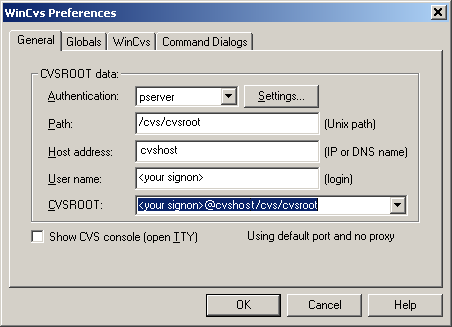
Before you can use CVS you must tell it where the repository is and sign on to the server using your signon and password. Following this you need to have CVS create a working copy of the project you are working on.
| Getting started |
|---|
|
When you first run WinCVS you will see the following dialog, which requests information on how to connect to the repository:
Once you have entered the details as above (replacing "<your signon>" with your CVS signon) you press OK |
| Signing on |
|
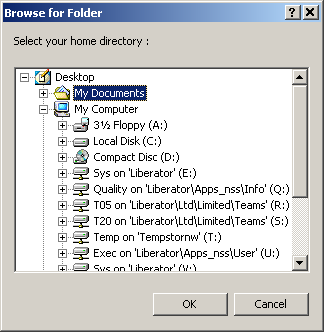
From the Admin menu select the Login option. If this is the first time you have used CVS it will ask where your "home" directory is:
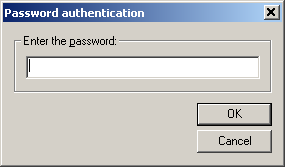
Select "My Documents" and press OK Next you will see the password dialog:
Enter your password and press OK Make sure that WinCVS displays the message "*****CVS exited normally with code 0*****" in the bottom panel. |
| Checking out a working copy |
|
Select the directory into which you wish to check out your working copy in the left hand panel and then, from the Create menu select the Checkout module option. You will see the following dialog:
Enter the project name and check the destination folder and press OK |
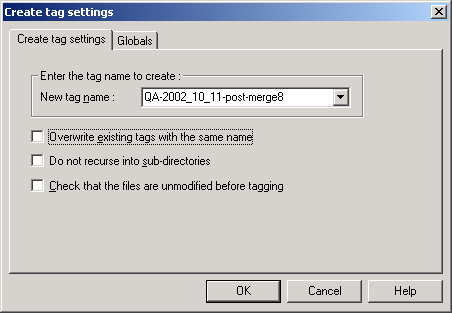
To provide convenient access to specific versions of the code, and to facilitate working with the changes between two versions it is desirable to give names to a version in the repository.
| Marking a version - tags |
|---|
|
Highlight the appropriate project (e.g.
Enter into the New tag name field something that will make sense to you like what is shown above. Ensure that you use the same format standard as displayed above. Make a note of the tag you have used and a brief explanation of what this has been tagged for. (See branches.txt and Tag names.) Select the OK button. |
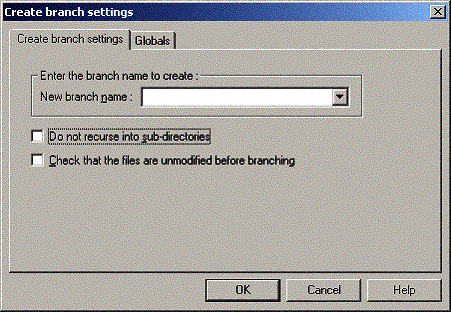
It is often desirable to isolate a version of the system from the changes being worked on by others. This simplifies the management of changes. CVS provides support for this by way of "branching".
| Creating a branch |
|---|
|
Highlight the appropriate project (e.g.
Within the New branch name
field you should enter the name of the QA branch you wish
to create. This needs to conform to the standard naming
practices we use (See Tag
names). For example
Once entered you can select the OK button. |
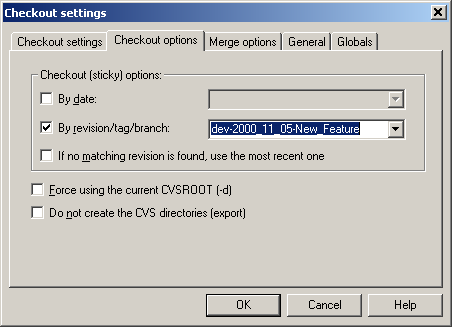
There are two ways to associate a working copy with a branch - for an existing working copy by switching to the branch or by checking out a new working copy of the branch directly.
| Switching to a branch |
|---|
|
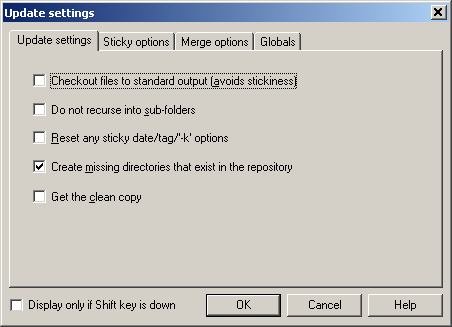
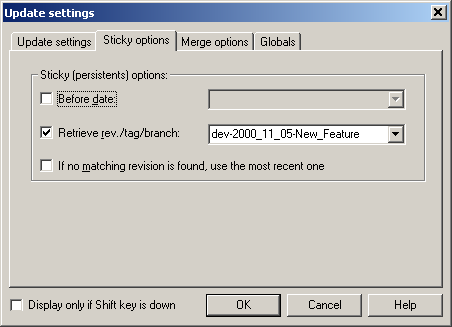
Within CVS right click on the appropriate folder (example grim). You will be presented with a pop-up menu. Select the Update selection - This will bring up Update settings dialog box:
NB: Do not select the Reset any sticky date/tag/'-k' options. (This updates the working copy from the trunk, which is not what you want.) Also, do not select Checkout files to standard output or Do not recurse into sub-folders. Similarly, do select the Create missing directories that exist in the repository option. Now select the Sticky options tab:
Select Retrieve rev./tag/branch and enter the branch name as shown. Finally, press the OK button. Make sure that WinCVS displays the message "*****CVS exited normally with code 0*****" in the bottom panel. More detail on the output of the update command shown in the bottom panel is provided above in Bringing your working copy up to date. |
| Checking out a branch |
|
Select the directory into which you wish to check out your working copy in the left hand panel and then, from the Create menu select the Checkout module option. You will see the following dialog:
Now select the Checkout options tab:
Select Retrieve rev./tag/branch and enter the branch name as shown. Press OK |
Once a working copy has been associated with a branch any changes made in the working copy and checked in will be applied to the branch. When updating a working copy it should be noted that any changes that have not been checked in will be retained: see Bringing your working copy up to date for details.
To change a file in your working copy you can just edit it as normal. (Don't change the files kept in CVS subdirectories - they are used by CVS).
If you add or remove files from your working copy of the project you need to tell CVS (otherwise it doesn't know if the working copy or the repository is 'correct'):
| Adding and removing files from a project |
|---|
|
In the right hand pane select the file(s) to be added and, from the Modify menu select the Add selection (or Remove) option. |
| Adding a directory to a project |
|
In the right hand pane select the directory(s) to be added and, from the Modify menu select the Add selection (or Remove) option. |
NB The above commands don't update your branch in the repository, it just records the change in your working copy. To update the repository with your changes you must check in your changes.
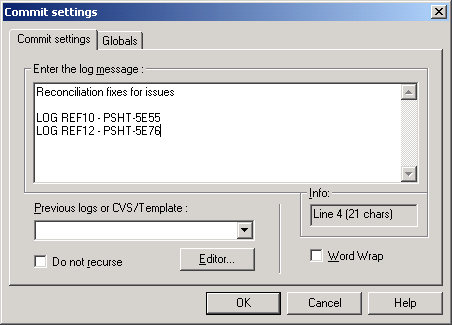
When you are sure that your changes will be an improvement (and that they don't conflict with anything in the repository) you should commit them.
| Checking in your changes |
|---|
|
Right click the working copy folder as above (example
Type some comments within the Enter the log message window. For example put in the error logs that have been fixed. Select the OK button to commit the changes to the current branch. |
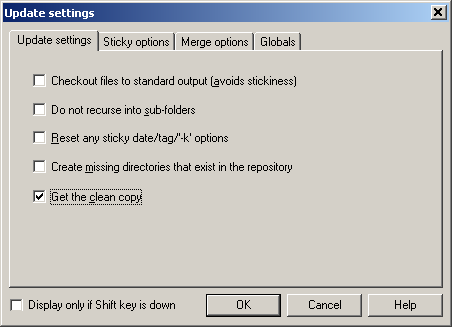
If you've made temporary changes or ones that that you've decided against then you can replace a file (or files) with the contents of the repository.
| Abandoning your changes |
|---|
|
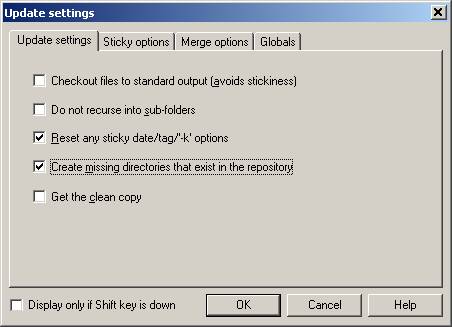
Within CVS right click on the appropriate file(s) or directorie(s). You will be presented with a pop-up menu. Select the Update selection - This will bring up the Update settings dialog box:
Select Get the clean copy as shown and press OK |
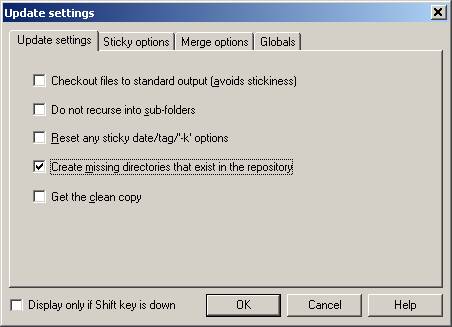
From time to time, and especially if others have updated the branch you are working on, it is a good idea to update your working copy from the repository. (Particularly before checking things in.)
| Bringing your working copy up to date |
|---|
|
Within CVS right click on the appropriate directory(ies). You will be presented with a pop-up menu. Select the Update selection - This will bring up the Update settings dialog box:
Select Create missing directories that exist in the repository as shown and press OK |
| Incorporating a change into your working copy |
|---|
|
Within CVS right click on the appropriate folder (example grim). You will be presented with a pop-up menu. Select the Update selection - This will bring up Update settings dialog box:
Select the Create missing directories that exist in the repository option. Now select the Merge options tab:
Select Only this rev./tag
and enter the Press the OK button. Make sure that WinCVS displays the message "*****CVS exited normally with code 0*****" in the bottom panel. More detail on the output of the update command shown in the bottom panel is provided above in Bringing your working copy up to date. |
When updating a QA branch with a specific change from the trunk you need to incorporate that change into your working copy.
| Incorporating a change into your working copy |
|---|
|
Within CVS right click on the appropriate folder (example grim). You will be presented with a pop-up menu. Select the Update selection - This will bring up Update settings dialog box:
Select the Create missing directories that exist in the repository option. Now select the Merge options tab:
Select
Plus with this rev./tag
and enter the Press the OK button. Make sure that WinCVS displays the message "*****CVS exited normally with code 0*****" in the bottom panel. More detail on the output of the update command shown in the bottom panel is provided above in Bringing your working copy up to date. |
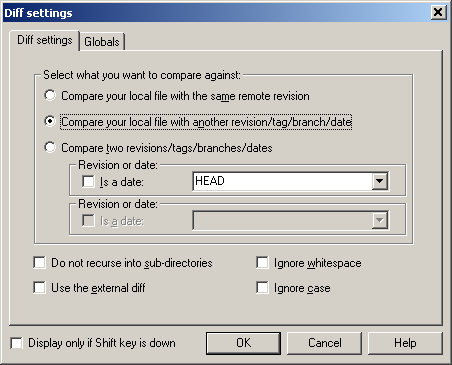
You will frequently want to see what the differences are between your working copy of a file and the repository.
| Incorporating a change into your working copy |
|---|
|
Within CVS right click on the appropriate folder (example grim). You will be presented with a pop-up menu. Select the Diff selection - This will bring up Diff settings dialog box:
Select options as appropriate and press the OK button. |
The trunk contains the latest development version of the system (it is not used to record work-in-progress). Developers need to work on the trunk for two principle reasons:
For both of these activities it is necessary to first synchronise the working copy with the trunk.
| Switching a working copy to the head of the trunk |
|---|
|
Within CVS right click on the appropriate directory(ies). You will be presented with a pop-up menu. Select the Update selection - This will bring up the Update settings dialog box:
Select Create missing directories that exist in the repository and Reset any sticky date/tag '-k' options as shown and press OK |
By convention tags names comprise a number of hyphen-separated
sections like:
dev-2001_07_21-whoops-messaging-start. Within each
section underscore is used to separate words (or groups of
digits). The meaning of the sections is as follows:
dev')
indicates that the label id is for development. (For a QA
branch the prefix would be 'QA'.)2001_07_21'.messaging'.start'.Typically there will be several tags associated with a task: these will have all but the last in common. The key tag name suffixes for a developer to remember are:
| tag names used by developers |
|---|
|
Testing and release tasks and the related activities are different in nature to those of developers, but the format for tag names is similar:
| tag names used by testing and release |
|---|
Note that there is no "task" element, and that the "merge" elements do not have meaningful names. |
In each top level project directory a "branches.txt" file is maintained. This is used to record tags used to identify branches - but there are additional tags associated with each branch. (See Tag names.) In addition to the tag name a brief description of the task and the name of the branch owner are recorded.
| Example branches.txt |
|---|
|
[1] CVS [Concurrent Versions System]: http://www.cvshome.org/
[2] "Version Management with CVS": http://cvshome.org/docs/manual/cvs.html
[3] "Open Source Development with CVS": http://cvsbook.red-bean.com/
[4] TortoiseCVS: http://www.tortoisecvs.org/
[5] GPL [GNU General Public License]: http://www.fsf.org/copyleft/gpl.html
[6] "There Ain't No Such Thing As A Free Lunch" The Moon is a Harsh Mistress Robert Heinlein
[7] smoke test: http://c2.com/cgi/wiki?SmokeTest
[8] SmartCVS: http://www.smartcvs.com/
2000: I'd like to thank the participants on the accu-general mailing list for the discussion that led to this paper being written, and especially Tom Hughes and Jim Hyslop for their review comments on the initial draft.
2003: I'd also like to thank my employer (Microlise) for allowing me to incorporate some of their procedures, the many colleagues who offered review comments, and especially Sarah Lees (who provided many of the diagrams used in the "patterns" section) and Pete Kilduff (who provided notes and diagrams on WinCVS and release processes).
Alan Griffiths
Copyright © 2000, 2001 Alan Griffiths
(alan@octopull.co.uk)
Copyright © 2002, 2003 Microlise
(alan.griffiths@microlise.com)


 on the toolbar You will
be presented with the following screen:
on the toolbar You will
be presented with the following screen: